Triangle baby quilt from 5 fat quarters

I have a dear friend whose sister is due with a baby this summer, and since no other babies are getting born that are close enough to me, I am totally sewing for this new baby.

I didn’t have a lot to go on for colors and fabrics from the mom-to-be, but then the genius idea struck to stalk her registry, and as it turns out she likes greys and blues. Then I hemmed and hawed for FOREVER picking these 5 fat quarters out, and I knew I couldn’t possibly add a single other fabric into the fold, so 5 fat quarters it is.

Screen Shot 2017-04-12 at 10.20.43 AM

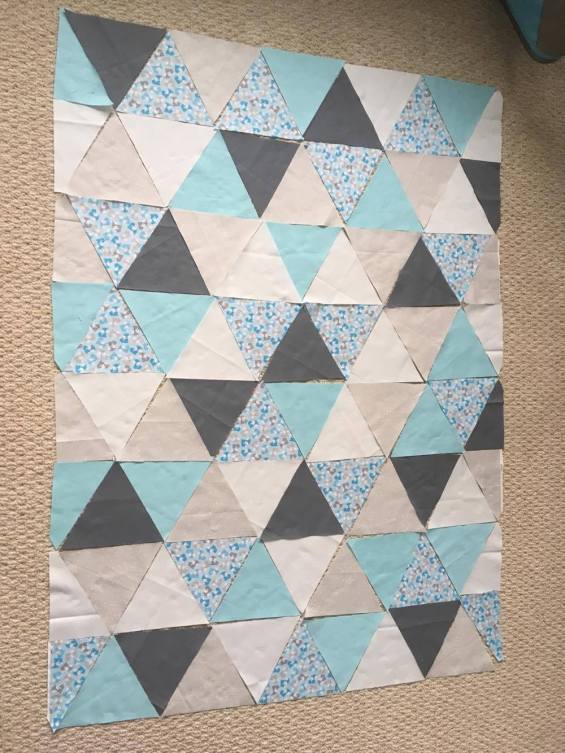
Finished size: Approximately 31″ x 43″

To make this quilt…

5 unique fat quarters
1/4 inch foot
pins
ruler with 60 degree mark
rotary cutter and mat

Lay out one fat quarter and mark 4 lines going the length (20″ side) spaced 5 7/8″ apart.

Mark the diagonal lines using your 60 degree mark on your ruler making the sides of each triangle measure 6 3/4″.

Screen Shot 2017-04-10 at 11.32.14 AM

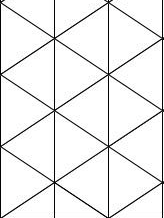
There is very little wiggle room on a fat quarter, but measure and mark carefully and you will get a total of 15 whole triangles and 6 half triangles.

Carefully stack all 5 fat quarters (putting your marked one on top) and cut out all the pieces using a rotary cutter and a fresh blade.

Lay out the triangles in 8 rows. Each row will have 9 whole triangles and 2 half triangles (at each end).

Screen Shot 2017-04-10 at 11.35.23 AM

Play with the arrangement until you like the look!

17859156_10101973229439667_51210314_o

Sew together each row, pressing seams open, and being careful to line up points as you go. Use the pin trick from See Kate Sew to line up your points!

17887120_10101973336874367_1389228691_o

I haven’t finished piecing mine yet, but I needed to get all these numbers out of my head and somewhere to stay for reference 🙂

Small divided sewing desk basket tutorial

I was gifted some amazing Heather Ross fabric in the Instagram #getyourquilywishesgranted tag, and I was feeling rather inspired to make myself something with some of the bits given to me from the Nursery Versary line. I’ve been wanting a little divided basket for my sewing desk for sometime to hold all the little odds and ends I like to keep readily available, so I set out to make one. Since I was going through all the effort anyway I figured I could write out a little tutorial for anyone else interested.

This finished little organizer measures 5.5″L x 3″W x 2.25″H.

Take a piece of normal computer paper and measure 2.5″ squares off of the corners. I drew out the dashed 1/4″ seam lines just so my brain could understand what I was doing.

FullSizeRender 4

Cut out two pieces from this pattern–an outside and a lining. I did the same for both.

IMG_4664

Then cut 4 rectangles the same size as the flaps. These will make outside pockets.

FullSizeRender 6

To finish the top edge of the pockets I like to press the edge under twice…

FullSizeRender 3

Then top-stitch it down…

FullSizeRender 2

Now take each piece with right-sides together and sew from corner to corner. I finished the bottom raw edge with my serger, though you could zigzag cut it, or just leave it raw.

IMG_4668

Here’s what it looks like with all 4 pockets sewn along their bottom edges…

IMG_4669

Flip them all up the right way and press.

IMG_4670

Then stitch up the corners so that you create a box…

IMG_4671


Inside out box…

IMG_4672

Right-side out box! Press all the edges so it stands up nice. At this point I also aded a few stitches in the middle of the long pockets to separate the sides a bit.

IMG_4674

Cut a 3.5″W x 6″L rectangle from your lining fabric…

IMG_4662

IMG_4675

Fold it right-sides together and stitch all the way around, all but a little bit at the end, and notch the corners.

IMG_4677

Then flip it right-side out and top stitch all around 3 of the 4 sides.

IMG_4678

Sew it down across the middle of your lining. I did two rows.

IMG_4680

Then sew up the corners so it creates your inside box!

IMG_4681

I couldn’t think of a better way to sew up the sides of the dividing panel, so I just pinched it in a straight line and hand sewed it all together.

IMG_4682

Fit the inside lining with divider into the outside box with the pockets, fold over the edges, and clip/pin in place.

IMG_4683

Top-stitch it down, and ta-da!

FullSizeRender 5

Yay!

FullSizeRender 7

Beautifully in use!

FullSizeRender

Please show me if you make one too!

Nintendo DS zipper pouch tutorial

For starters, I’m going to refer your direction to this simple zipper pouch tutorial from Melly Sews. This is the same basic zipper pouch method I use for all of my zipper pouches, plus or minus some extras. In this case the extras include a little flap inside to hold two DS game cartridges, as well as a loop on the outside for a wrist strap.

Nintendo DS cartridges aren’t terribly large…about 1.25″ square, give or take…

And the 2DS itself is about 6″W x 5.5″ H x maybe 1″D at its deepest…
  

So I cut out my squares for the outside and lining fabric to be about 9″W x 8″ H. I only sew with 1/4″ seam allowances, but I knew I’d end up doing the zipper a little crooked or something, so I’d rather have extra to trim than having too little…
  

I started by making the inside flappy-cartridge-pouch. I cut a piece of coordinating fabric that was 12″L x 4.5″W…

I flipped it right-sides together lengthwise and sewed up the two long sides, leaving the top short side open to flip it back right side out…
  

Then I folded up the bottom, clipped it in place, and top stitched it to stay that way…

Plus a line up the middle makes for two separated cartridge storage pockets…

Then this is where I will once again refer to the already-existing pouch-making tutorial, only add in the cartridge-storage-flappy-thing with the outside fabric / inside fabric / zipper sandwich…
  

The wrist strap I cut about 3.25″W x 12″L…
  

And I just turned and top stitched down both sides. I never really bother to sew straps like this inside out first, I find flipping them right side out to be too frustrating…

Once again, referring to the already-existing zipper pouch tutorial, I sewed right sides together of the outside fabric (remembering to have the wrist strap in place, too), and then finished the inside lining fabric, and ta-da! I recommend pressing before photographing, but, well…

We’ll see if my daughter will forget about my promise of a zipper pouch for her DS until Christmas rolls around because I would really like to save it as a gift for then 🙂

Also, the overall size of the zipper pouch could easily be altered to accommodate a 3DS or other handheld gaming system, as well as possibly including some quilt batting as some extra padding.

Doll triple bunk bed

The 18″ American Girl dolls are multiplying here, between mine from childhood, my cousin’s from childhood, and an upcoming gift idea, so a doll bunk bed was in order since the doll double bed just wasn’t cutting it any more. I sketched out a general idea, had Home Depot make half of the cuts, and cut the rest by hand at home. Overall, I’m pleased. It works, at least, and kiddo is happy!

15304234658_29747a8db1_h 15490535892_3d63cabcb4_h

Wood project

Inspiration struck again. Well, actually, this was the original inspiration anyway but my friend and I didn’t have the time to work together to build it until today…

And here are my chicken scratch plans, with the shopping list in the upper left corner. The only change is my friend decided on using 2×6 boards instead of 1×6, but it didn’t alter the other measurements at all.

It’s a big hit with the kids, and it’s sturdy as all get out and weighs a ton!

Lily’s new desk

Here are my plans I drew out…
Untitled

And here is the finished product…

Untitled

…Well, almost finished, once the top sets and the clamps are off it’ll be 10% done.

If anyone is looking to DIY this specific little desk, I made it to fit an Ikea kid’s chair that has a 12″ seat height and an 11″ width, and the lists at the top left of my plans are the boards/cuts needed. I had Home Depot do all the cuts for free, including the chalkboard laminate top, and I nailed it all together at home in less than an hour.